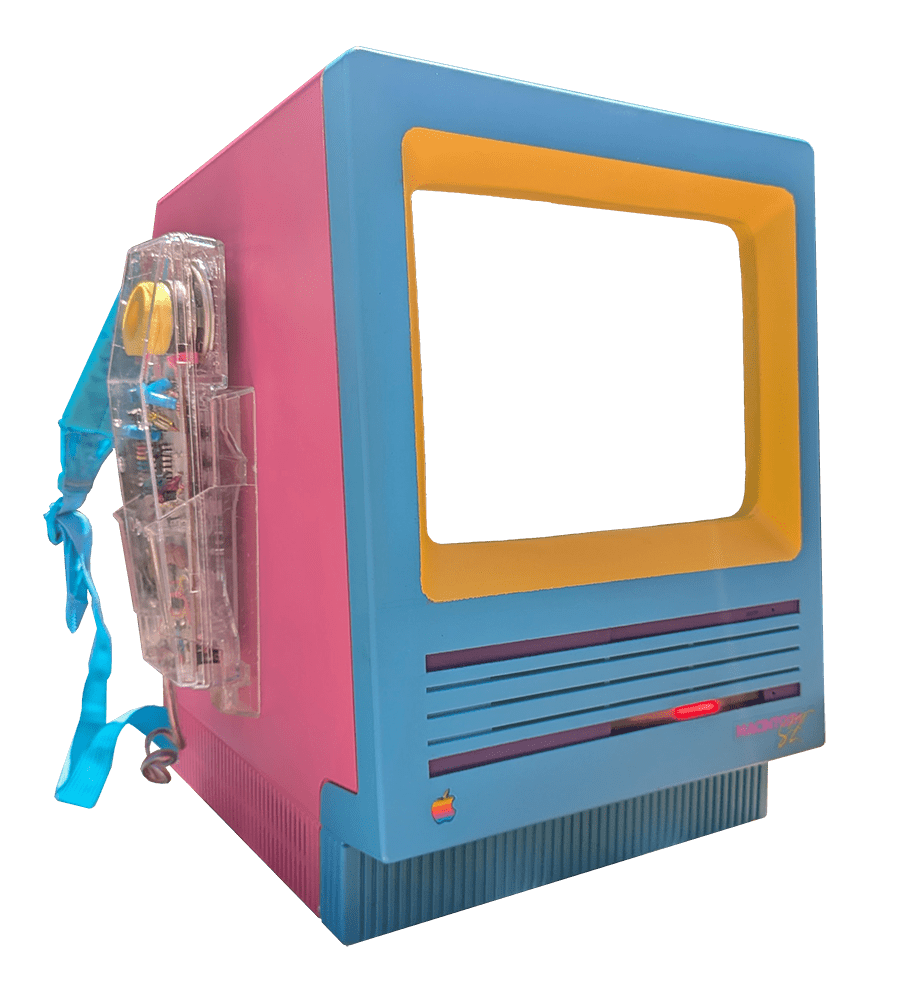
Macintosh SE: This started out as an original Macintosh SE case, shell only - no internals at all. I've actually had this for years, with a
similar set of components inside, but if you don't - maybe try eBay?
LCD bracket: There's a lot of STL files floating around to print your own LCD bracket to replace the CRT in any Macintosh 128k/512k/Plus/Classic/SE, but at the time of building this, I didn't have
a 3D printer, so I bought one already printed off Etsy. After fitting it into the case's faceplate, I used Bondo Spot Putty to fill in the gaps before painting.
USB Ports: I wanted to make use of all the holes in the back of the case, so I got some flush panel mount USB ports, that would be connected to the pi inside the case, and would allow me to optional plug in USB cables as needed from the outside of the case.
I went with one 2-port USB-A panel mount connector, and two USB-C flush panel mount cables which fit perfectly in the holes in the bottom of the case. Ok, I did had to Dremel the holes a tiny bit wider to fit. One is used as a dedicated power adapter.
I also picked up some 5/8" bushings to plug the other two holes and make that bottom back panel look nice and clean.
Power Switch: I wanted a big fat rocker switch on the back to turn the whole thing on and off, so I bought one (or 5) off Amazon. I think soldered some long wires to only 2 of the 4 pins on the rocker switch and connected them to the Pi's GPIO pins (pins 5 and 6 specifically), and used the script from
HowChoo's Raspberry Pi power button tutorial.
Since the rocker switch was slightly too small to snuggly fit in the hole in th back of the case, I had to improvise with a piece of plastic. I cut a square plastic collar for the rocker switch, painted it to match the case, and gorilla glued it to the rocker switch.
Straps: I just cut off the straps from a neon multicolor Jansport backpack, but any backpack straps will do here. I sewed the tops of both straps together in a "V", sewed those to an additional bit of strap, then poked the long M4 case screws through those to attach everything to
the case under the top handle. The bottom of the straps I poked through the bottom vents on each side (I did have to Dremel out one slit on each side), and then sewed a button on each strap inside, to ensure the strap wouldn't come out.
Phone?! Yes, though it's not connected to the computer....yet! I ran out of time before Def Con, but this is my next project - adapting the phone to be a mic and speaker that plugs into the computer via 3.5mm headphone jack.
This was all inspired by the Intermatrix MacPhone, a real 3rd party Macintosh accessory from 1984, which I found out from LGR's video on it.
I had to have it, but since there was only one on eBay for $300, I quickly decided I did NOT need this phone, and would go with a different one. So I bought this clear phone off eBay for $20, which goes much better with the vaporwave aesethic I'm going for.
Computer:Raspberry Pi 4, 8GB ram. Obviously its running on a Pi. I started out with a Pi 5 (latest at the time), but there still isn't a lot of 3rd party support for the 5;
I ran into issues with USB drives not mounting, audio not playing, screensaver not working - all of which just worked on the Pi 4 without issue.
I also got a Geekworm Armor Case for the pi, which acts as a giant heat sink, instead of a fan.
Battery: The battery I chose was the Anker Power Bank - arguably overpowered for this, but I wanted a battery with pass-through charging - so that I would only have 1 USB-C cable coming out the
back. This could run all the components off power AND charge the battery at the same time when plugged in. This power bank also has a handy app, that connects over bluetooth, so I can see exactly what the battery is doing, its temperature, and power draw without having to open the case and pull it out.
Speakers: I already had a cheap pair of desktop USB speakers off Amazon (no longer available, but something like these), that used USB for power and headphone jack for audio, with a volume dial. I tore off the plastic housing for the
speakers, screwed them to a plexiglass plate that I screwed to the inside of the Mac's faceplate, and positioned the volume dial where the Mac's original screen brightness dial used to be.
Case Fan: After testing and seeing how hot the battery got, I decided to get a fan for inside the case, which also runs off USB. This helped bring the battery temp down to around 80˚F (as opposed to 95˚F).
SD Card Imaging: Raspberry Pi has their own imager software that makes putting any OS image on an SD card a breeze, and includes 3rd party OS's - like RetroPie!!
Operating System: This baby is running RetroPie, an OS for RPI's that is made for retro gaming, with tons of emulators out of the box!
Theme: I designed a custom Emulationstation theme myself for this, to look like System 6, then I made ANOTHER theme to make it more vaporwave - download the theme here!
Making my own Emulationstation theme was fairly easy, thanks to their great documentation, and the Amiga Workbench theme
for the inspiration (hence where then name 'macbench' comes from).
Screensaver: I wanted to implement an After Dark screensaver for the whole system (emulationstation specifically allows for image, slideshow, or video screensavers), and
stumbled across a Flying Toasters MP4 file that was perfect! Download it here!
Honorable Mention - Macintosh emulator: Despite RetroPie doing a lot of the work for you, some emulators take some configuring. I used the Mini vMac emulator (as opposed to Basiliskll),
but needed to recompile it for my specific screen size and needs (arm build did not immediately work). I also wanted 2 different versions: default Mini vMac Macintosh Plus (black & white), along with a Macintosh Classic II (color) side by side.
Learning how to compile the Mini vMac (on the RPI no less) was it's own adventure and side-quest, but I tackled that mini boss and chugged on.
Prep: Scuff up the entire piece with a Scotch Brite Scour Pad (not sandpaper), just enough to take the shine off.
Then wipe down with a wet paper towel, because there will be green dust all over it, and let dry.
Adhesion Promoter: This is critical for spray painting plastic. I used Dupli-Color Adhesion Promoter Spray (Amazon or any auto parts store) and followed the instructions on the
can for times between coats and primer.
Primer: I used Rustoleum White Primer, and again followed the instructions on the can for coat reapplication and dry times. Since I used Krylon for color, I've been told you want stay within the same brand for everything,
and I should have used a Krylon primer. My local store didn't have this, so I went with Rustoleum; but after seeing how easily it's gotten
nics and chipped, I'm inclined to believe this and the finishing enamel might have been the issue.
I choose white primer specifically since I was using a light yellow color, and wanted to ensure it would be as bright as possible.
Color: I used Krylon for all my spray paint colors, as I've heard its the best for bright colors; and I certainly can't argue with the results. Specifically for this project, I used: Hot Pink,
Lagoon Blue,
Sun Yellow, and
Rich Plum.
Finish: I used two finishing sprays: first, Krylon Matte Finish, then Rustoleum Matte Clear Enamel.
The color paint left the project shiner than I liked, and the Krylon matte spray really made it look like a real, retro product! I had watched reviews of a few different matte sprays, and Krylon's was far and away the best looking.
Since I knew this would get knocked around being worn as a backpack, I also wanted to do a more protective layer on top after everything was done.
As I mentioned above though, I think using Rustoleum and not Krylon here might have been
a mistake, since it still got chipped pretty easily being worn at Def Con. Krylon does not make a clear enamel, but I might experiment with some other clear finishing sprays.
Again, follow the instructions on each can for specific application and dry times - each layer is different.
Full parts list, including spray paint and screws used, with links can be found here.
Oh and that clear phone on the side? I have no idea what make or model it is, as I found it on eBay. If you have more info on it, let me know!